
Roof Leak Repair (10 Fast Fixes & What It Costs In 2026)
Roof Leak Repair (10 Fast Fixes & What It Costs In 2026)
A leaky roof can be a homeowner’s nightmare, leading to water damage, mold growth, and compromised structural integrity. Roof leak repair costs typically run $300 to $1,500 for most residential fixes — but the right first question is not “how much will this cost?” It is “can I fix this myself, or does this need a professional?” This guide walks you through 10 fast fixes, what each one costs, and the signs that tell you to stop the DIY and call a pro.
This guide covers:
- Symptom-to-source diagnosis
- DIY-safe repairs and their limits
- Professional-only repairs
- The 10-step repair process
- What roof leak repairs cost in 2026
Diagnose the Source Before You Repair Anything
Before touching a single shingle, identify what your leak is actually telling you. Water rarely enters exactly where it shows up inside. Here are the most common leak presentations and what they usually mean.
Water Stain on Ceiling but No Missing Shingles
The most likely culprits are flashing failures at a chimney, skylight, pipe boot, or roof-to-wall transition where the metal has lifted, cracked, or separated from sealant. It can also indicate a compromised valley or a nail pop that lifted a shingle slightly without displacing it. These leaks are often small in origin and large in interior damage because water travels along rafters before dripping.
Leak Only During Heavy Rain
A leak that only appears during downpours points to a volume-dependent entry point — most often a blocked gutter backing water under the drip edge, or an improper shingle overlap that handles light rain but fails under heavy flow. Valley leaks also tend to be volume-dependent. Wind-driven rain causing a leak at a specific wall location points to a flashing or siding transition issue.
Leak Near a Chimney or Skylight
Chimneys and skylights require flashing at multiple transitions. Any failure channels water directly into the roof assembly. Staining in a cone shape below a skylight or following a chimney corner almost always traces back to flashing.
DIY-Safe Repairs: What You Can Handle Fast
Some roof leak repairs are genuinely manageable for a careful homeowner with basic tools and comfort working at height. Know your limits — if you are not confident on a ladder or sloped surface, stop and call a professional.
Minor Flashing Re-Seal
If you see lifted or cracked sealant around a pipe boot, small vent, or flashing edge without structural displacement of the metal itself, re-sealing with a compatible roofing sealant is a reasonable DIY fix. Clean thoroughly, apply new sealant, and press firmly into the joint. This buys time on failing metal but is not permanent if the flashing itself is corroded.
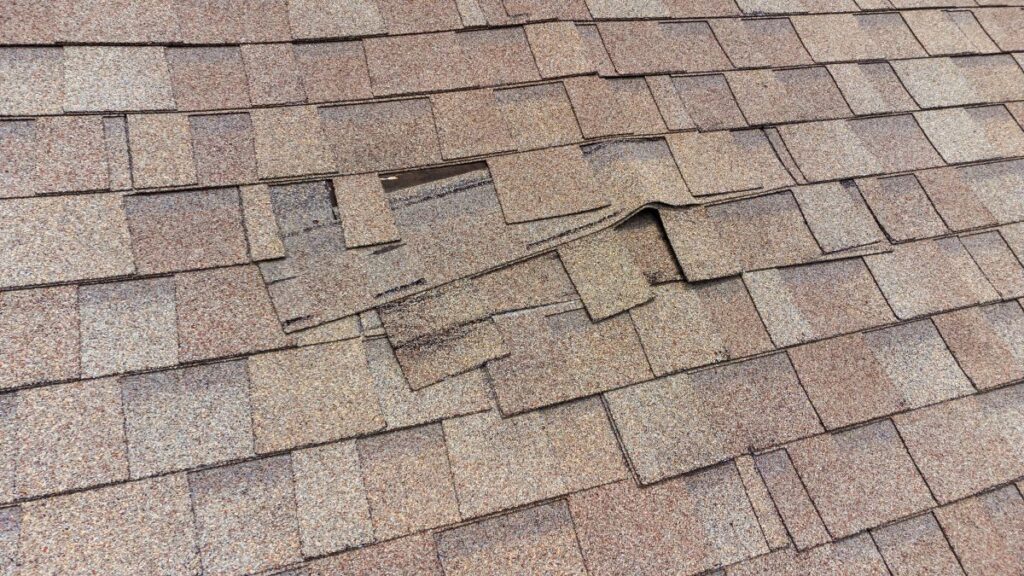
Small Shingle Replacement
Replacing one to three damaged shingles on an accessible, moderate-slope roof is within DIY range. The process involves lifting surrounding shingles, removing damaged ones, and installing replacement shingles with proper nailing and sealant. See our guide on missing shingles on a roof for the full step-by-step. Be cautious if surrounding shingles are brittle — forcing them up risks cracking additional material.
Gutter Clearing and Maintenance

Blocked gutters that back water under the drip edge are a common and entirely DIY-fixable source. Clear debris, flush downspouts, and confirm gutters slope properly toward exits. No roof access required.
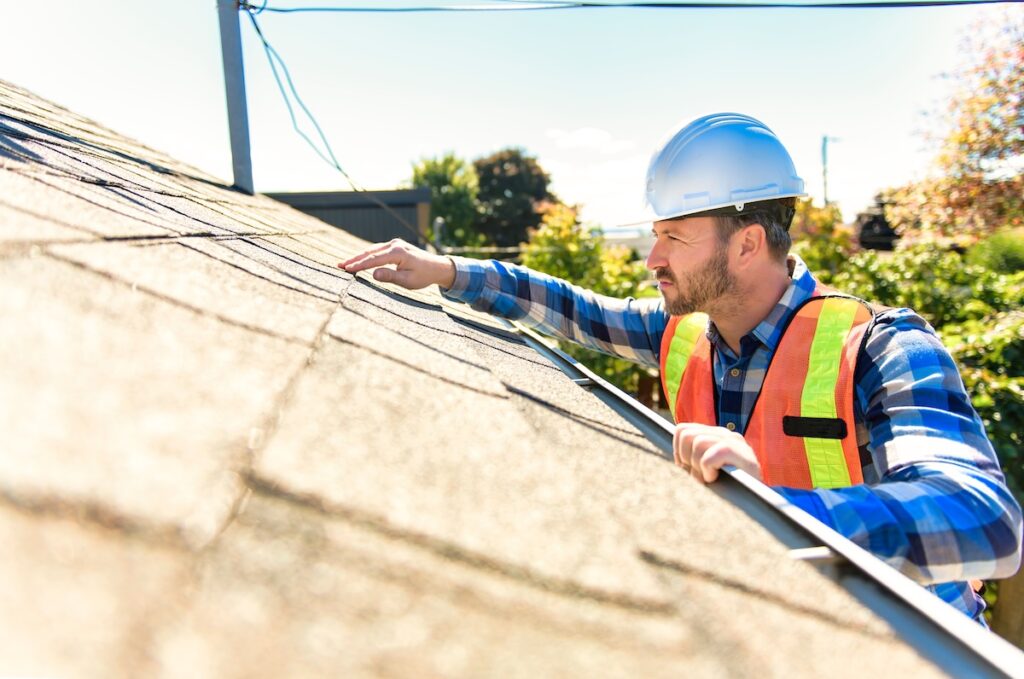
When to Call a Professional Instead
This is the most important section for protecting your safety and your home. Stop and call a professional when:
- The roof deck or sheathing is visibly soft, spongy, or sagging — structural damage requires assessment before any surface repair.
- The leak involves a valley, hip, or ridge — high-complexity areas where improper repair accelerates deterioration.
- Multiple shingles across a large area are damaged or curling — this signals systemic failure where roof replacement is likely more cost-effective than repeated patching.
- You see mold, significant insulation saturation, or widespread attic staining — damage has progressed beyond surface repair.
- The leak is at a chimney or skylight and flashing is displaced or corroded — these transitions require professional installation.
- The pitch is steep, the surface is wet, or you are not confident physically — falls from roofs cause serious injuries.
A roof inspection checklist from a qualified contractor takes less time than a DIY attempt gone wrong and comes with an accurate scope and a warranty on the work.
If your repair falls into any of the categories above, contact Embry’s Roofing for a free inspection before attempting a fix. Our team will tell you honestly whether it is a DIY-manageable issue or something that needs professional attention.
10 Fast Fixes for Roof Leaks
For repairs that fall within DIY range, here is the full process.
1. Identify the Leak

Finding the actual source is the first and most important step in repairing a leaking roof. Inspect the attic for stains, mold, or damp insulation along rafters. If the source is not obvious, have someone spray water on the roof section by section while you watch from inside for drips.
2. Gather Tools and Materials
Ladder, safety harness, roofing nails, roofing cement or sealant, replacement shingles, pry bar, hammer, roofing paper (underlayment), utility knife, trowel, and measuring tape.
3. Follow Safety Precautions
Never work on a wet, icy, or wind-affected roof. Use a stable ladder, safety harness, rubber-soled shoes, and gloves. Always work with a partner who can assist or call for help.
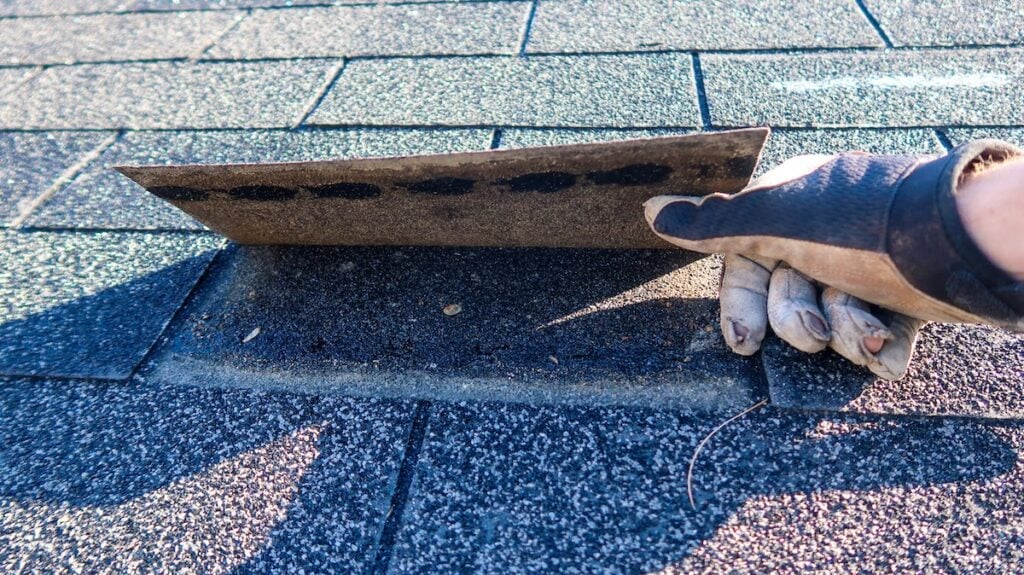
4. Remove Damaged Shingles
Use a pry bar to lift surrounding shingles and break the adhesive seal. Carefully remove nails and pull damaged shingles free without cracking adjacent material.
5. Replace Roofing Paper
Measure and cut new roofing paper (underlayment) to cover the exposed area. Secure with roofing nails before installing new shingles.
6. Install Replacement Shingles
Align new shingles with existing ones, nail securely, and apply roofing cement or sealant to the edges for a watertight seal.
7. Repair Roof Penetrations
Inspect flashing around chimneys, vents, and skylights for damage, rust, or separation. Replace compromised flashing and apply roofing cement around all penetrations. This is where many DIY repairs fall short — if the flat roof repair guide’s penetration steps reveal displaced or corroded metal, call a professional.
8. Inspect and Clean Gutters
Remove debris from gutters, check for sagging or damaged sections, and confirm downspouts direct water away from the foundation.
9. Conduct a Final Inspection
Check for any missed damage, test the repaired area with a hose if possible, and inspect the attic and ceiling for remaining moisture or staining.
10. Prevent Future Leaks
Schedule biannual roof inspections, maintain flashing around all penetrations, trim overhanging branches, keep gutters clear, and address minor damage promptly before it escalates.
What Roof Leak Repair Costs in 2026
Professional roof leak repairs typically range from $300 to $1,500 depending on the extent of the damage, roofing material, and local labor rates. Minor flashing re-seals and single-shingle replacements fall on the lower end. Structural damage, valley repairs, or widespread shingle replacement fall toward the higher end or into replacement territory. For a full breakdown by damage type and material, see our roof repair cost guide.
Trust Embry’s Roofing for Expert Leak Repairs
Roof leak repair is straightforward when the damage is isolated and the cause is clear. When it is not, the cost of a wrong fix is almost always higher than calling a professional first. At Embry’s Roofing, our team identifies, diagnoses, and fixes roof leaks with 45 years of experience behind every inspection. We’re proud to serve homeowners across Evansville, IN, and surrounding communities including Vincennes, IN with free inspections and honest assessments. Contact Embry’s Roofing today for a free inspection and find out exactly what your roof needs.
CHECK OUT THE LATEST
FROM OUR BLOG


