Metal Roof Trim Installation in 7 Steps
When it comes to roofing a commercial property, every detail matters—and that includes metal roof trim. High-quality metal roof trim doesn’t just make your building look polished and professional; it also protects your roof from weather extremes and structural damage. If you’re planning to install or upgrade your roof, understanding the process of installing metal roof trim is critical. This blog will provide:
- An overview of what metal roof trim is and why it’s important.
- A step-by-step guide to installing metal roof trim.
- Pro recommendations for ensuring long-term durability.
🏠 What Is Metal Roof Trim?

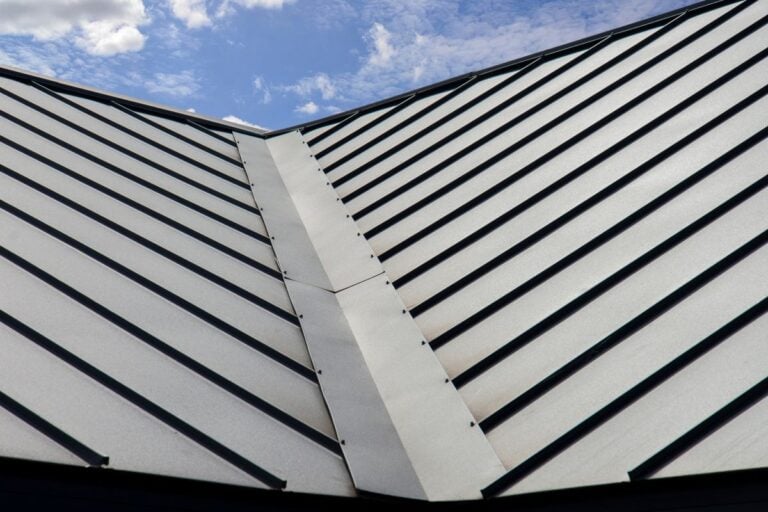
Metal roof trim refers to the finishing pieces installed around the edges and joints of a metal roof. These trims serve both functional and aesthetic purposes, helping to seal the roof against wind, rain, and debris while giving it a sleek and professional appearance. Common types of trim include ridge caps, drip edges, and gable trims.
For commercial properties, investing in durable and properly installed roof trim can extend the lifespan of your roof while reducing long-term maintenance costs.
Why Metal Roof Trim Is Essential
- Weather Protection: Trim prevents moisture and wind from getting beneath the metal panels, protecting the structural integrity of the roof.
- Aesthetic Appeal: Whether it’s a retail space or a warehouse, clean and polished trim enhances your building’s curb appeal.
- Longevity: High-quality metal roof trim can prolong the life of the roof by minimizing wear and tear on key areas, such as corners and edges.
👉 7 Steps to Install Metal Roof Trim

Installing metal roof trim is essential for protecting your roof from water damage and ensuring a polished, finished look. Proper installation enhances durability and improves the overall efficiency of your roofing system.
1. Gather Your Tools and Materials
Before starting your project, it’s essential to gather all the necessary tools and materials to avoid interruptions during the installation process. You’ll need metal roof panels, trim pieces such as ridge caps and drip edges, a hammer or drill, roofing screws and nails, ribbed foam closure strips, and a sealant or caulking material. Having everything organized and ready will not only streamline the installation but also help ensure accuracy and efficiency as you work through each step of the process.
2. Measure and Cut Your Trim
Accurate measurements are a crucial step in preparing your roof trim for installation. Begin by carefully measuring the areas where trim will be installed, such as the roof edges, ridges, or gables. Take note of the measurements and use a metal guillotine or a pair of tin snips to cut the trim pieces to the exact lengths needed. Double-check your measurements to ensure precision, as even a small error can affect the fit and effectiveness of the trim. Investing time in careful measuring and cutting will save you from potential adjustments later.
3. Install Drip Edge Trim
The drip edge is the first piece of trim to be installed on your roof, and it plays a vital role in creating a waterproof barrier. Start by positioning the drip edge along the eaves of the roof, ensuring that it extends slightly beyond the roof’s edge to direct water away from the structure. Once in place, secure the drip edge with roofing nails or screws, spacing them evenly to ensure stability. This step is critical in protecting the roofline from water damage and ensuring that rainwater flows off the roof properly rather than seeping into the edges.
4. Lay Down Closure Strips
To maximize the durability and protection of your roof, apply ribbed foam closure strips along the edges of the roof panels where they meet the trim. These strips are designed to fill gaps, particularly along curved or uneven edges, preventing water, pests, and debris from entering through small openings. Carefully align the closure strips to match the contours of the roofing panels and press them firmly into place. By filling these gaps, you’ll enhance the roof’s resistance to leaks and environmental wear.
5. Attach Gable Trim
The gable trim is essential for sealing and covering the side edges of the roof, providing a clean and finished appearance while protecting against wind and water infiltration. Line the gable trim along the side edges of the roof, ensuring it overlaps slightly with the drip edge for a seamless connection. Once properly aligned, secure the trim with screws, spaced evenly to ensure a strong hold. This added reinforcement will help the trim withstand strong winds and other weather conditions, keeping your roof protected for years to come.
6. Secure the Ridge Cap
The ridge cap is a critical component that seals the seam at the peak of the roof where the two panels meet. Its purpose is to prevent leaks and enhance the roof’s overall structure. Begin by positioning the ridge cap evenly over the roof’s peak, taking care to align it correctly for a uniform appearance. Secure the ridge cap by fastening it to the roof with screws, spacing them evenly for a balanced and secure installation. To further enhance waterproofing, apply sealant under the ridge cap before finalizing the screws. This extra step ensures that no water can seep through the seams, providing long-lasting protection.
7. Clean Up and Inspect
Once all the trims are installed, it’s time to clean up and inspect your work. Carefully go over the entire installation, checking each joint to ensure it is airtight and that all screws are properly secured. Look for any loose components or areas where adjustments may be needed. Additionally, remove any leftover debris, sharp edges, or excess materials that could damage the roofing panels over time. A thorough inspection and cleanup will ensure that your roof is not only visually appealing but also durable and ready to withstand the elements.
💡 Additional Tips for Durability

Durability ensures your items last longer, saving you money and reducing waste. Following these tips can help you maintain quality and get the most out of your investment.
Choose High-Quality Materials
Investing in high-quality, weather-resistant materials is crucial for ensuring the durability of your roof. Opt for trims and components specifically designed for commercial-grade roofs, as they are built to withstand harsh weather conditions and daily wear and tear. Using subpar materials may save money upfront but can lead to expensive repairs or replacements down the line.
Consult Professionals for Complex Roofs
If your roof has unique features or challenges, such as intricate designs or varying elevations, it’s essential to work with experienced roofing professionals. Professionals have the expertise to address complex issues and ensure the roof is installed correctly. They can also recommend the best materials and techniques for your specific needs, saving you time and money in the long run.
Schedule Routine Maintenance
Creating a schedule for regular roof inspections and maintenance is one of the best ways to extend its lifespan. Routine check-ups can identify small issues, such as loose trims or minor leaks, before they escalate into costly repairs. Proactive maintenance can also improve the overall performance of your roof, ensuring it remains durable and efficient for years to come.
👨🔧 Metal Roof Trim
When it comes to metal roof trim and installation, Embry’s Roofing is the team you can trust to get the job done right. With over 45 years of experience, expert knowledge, and a commitment to customized solutions, we deliver exceptional results that protect and enhance your property. Let us show you why hundreds of satisfied customers continue to choose us for their roofing needs.
Contact Embry’s Roofing today to schedule a consultation and take the first step toward a durable, reliable roofing solution!
CHECK OUT THE LATEST
FROM OUR BLOG